Your phone can do a lot of things, but can it do what you want it to? Maybe. The engineers and designers at Apple are determined to make the most user-friendly products and anticipate your needs as much as possible. However, they're not always the best at letting their customers know all the things their products can do.
1. Set a sleep timer for your music.
If you like to drift off to peaceful slumber to serene, relaxing music, but you don't want it to keep playing long after you're asleep, you can set a timer through the Clock app.
2. Create your own custom vibration pattern.
You can tap out your own vibration pattern to customize it for certain contacts or for types of notifications. Just go to Settings>Sounds>Ringtones>Vibration>Create New Vibration and use your finger to tap out the pattern.
3. Flashing alerts.
If you're in a crowded restaurant and waiting on an important call, you could easily miss your ringtone or vibration. Take it up a notch by enabling the camera's LED for notifications through Settings>General>Accessibility.
4. Shake it to undo mistake-filled typing.
Just like an Etch-A-Sketch (for those of you who remember such things), you can just shake your phone to start over fresh when you make mistakes.
5. Make your phone run faster by clearing up RAM.
If you hold down the power button long enough to see the "slide to power off" prompt and then hold down the home button, the screen will go blank and then your home screen will re-appear.
6. Make your phone run faster by clearing the cache.
If clearing the RAM didn't help much, try clearing the cache. In any of the App Store, Podcasts, Music, Game Center, and Phone apps, tap any single icon along the bottom 10 times to clear the cache.
7. Check timestamps for text messages.
Isn't it annoying how your conversations seem to float free in time, without any relation to reality? Well, the time stamps for messages are actually there; they're just off the screen. Drag your thumb to the left to reveal the time stamps of each message.
8. See all the tabs you recently closed in Safari.
If you want to go back and reread or forward an article you closed recently, just hold down the "+" symbol at the bottom of the screen to have Safari open up a list.
9. Turn your iPhone into a level.
You don't need to download a third-party app, just launch the Compass app and swipe left.
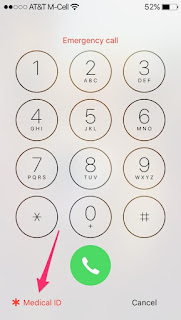
10. Provide critical medical information in case of emergency.
You always knew your phone was a lifesaver, but now it literally could be. You don't necessarily want to rely on your phone to cough up important information when your life is on the line, but it's another helpful tool. Fill out the form under the Health app with as little or as much detail as you like; remember, this information is available without unlocking your phone, so only put in info that you're comfortable sharing.
11. See only unread emails in your inbox.
Because a cluttered inbox is the worst, open the Mail app and tap the Mailboxes link, then tap "Edit." Tap the circle next to "Unread" and you'll have a folder with only your unread emails.
12. Find out what flights are overhead.
Ever see a jet up in the sky and wonder where those folks are headed? As with so many things in life, just ask Siri and she'll come up with the answer.
13. Don't settle for bad wifi.
Is there anything more frustrating than a slow connection? You don't have to suffer through that nightmare anymore. Go to Settings>Cellular, scroll to the bottom, and turn Wifi Assist on. Just like that, if you're on a poor wifi connection, your phone will automatically switch back to your LTE connection. And if you're worried about a big bill for data at the end of the month, Wifi Assist won't activate with background downloading or with some third-party streaming apps.
14. Use Night Shift and Low Power Mode at the same time.
Apple introduced the low-light mode to be easier on the eyes after dark, but for some reason didn't want it to be active at the same time as Low Power Mode. Determined users have found a workaround, however. Once again, get Siri to do it. Specifically, activate Low Power Mode in Settings>Battery, then start Siri and ask her to enable Night Shift. Siri will warn you about having to turn off Low Power Mode to turn on Night Shift, but tell her to go ahead anyway. Before Siri confirms, press the sleep button. You should hear a confirmation beep and, when you unlock your phone again, Night Shift and Low Power Mode should be running at the same time.
15. Hard reset.
When absolutely nothing else will work, it's time for a hard reset. Sometimes your phone just needs a timeout. Hold down the home and lock buttons for five seconds or until the Apple symbol shows up and you'll be back in business.
usually mobile user download songs from internet but iphone user can't download songs direct from internet. they have to pay for song in itunes. here i show you how to download any song free on iphone
need:
1 iphone
1 PC
itunes download on pc ( http://www.apple.com/in/itunes/download/ )
STEP 1:
download itunes on your PC & install it.
STEP 2
connect your iphone with PC threw USb cable
STEP 3:
download songs or import from CD,USB and import it into itunes
this way add your songs that you want to store on your iphone
The following abbreviations can be written in any Doodle Army 2: Mini Militia multiplayer chat. If sound is turned on you can here a voice, obviously the one of the "Commander ", saying the following things..
GG - Good game
CM - Cover me!
MO - Move out!
GM - God they got me!
NS - Nice shot
WP - You wanna peace of me?
NN - Nooo!
RU - Ready up!
CB - Come on, boy!
HH - Hooah!
LG - Let's go, yeah!
BI - Bring it!
To improve rocket boot speed, melee while flying. Meleeing will give you an extra boost. Oh yeah, this also works for walking.
Crouch(or squat) when a grenade comes near you, and you will take reduced damage.
When you have shield and a bomb is thrown, lower down the shield and save your life.
Have you been tired of people chatting and not hurrying up so you can pwn noobs? Copy and paste “i like to move-it” into the chat bar and the game will auto start.
Duck when a grenade is thrown at you in order to reduce the damage.
When a bomb is thrown at you and you have a shield, lower it down to save your life.
In a multiplayer online game it can be often annoying to wait for others to get the game started. One simple cheat is to type “I like to move-it” in the chat bar and the game auto starts.
A problem may occur in gradual destruction of cyborgs. Use the joystick movement and shooting. Carefully observe the celestial expanse when cyborgs appear from the sky. The hero has the time to dodge enemy attacks.
You can earn battle points to rank up by playing online death match games. Since the game has in-app purchases, you can buy points by going to Settings>Store> Buy Points. These battle points are required to buy items from mini militia store.
Rocket Boots and Walking Speed Trick
To improve rocket boot speed, melee while flying. Meleeing will give you an extra boost. This also works while walking, jumping or crouching. You don't need specific weapons to do it. The weapon you use just defines the speed you're "tricking" with. Small weapons like the Magnum or the Machette work best.
Doesn't every players sometimes wants a really big weapon such as the Rocket Launcher or the M93BA (Sniper Rifle)with him? But before you use such a big weapon, be aware of some dangers of them. One is, that you're not as agile with a Rocket Launcher than with an Uzi. That's because of it's weight. These weapons might be pretty usefull in PVP combat, but keep in mind that your opponents might be faster than you.
Such heavy weapons slow down every of your moves, so it sometimes might be helpfull to carry a more lightweighted weapon such as the M4 with you. Just in case.
Android is a very smart device which provides lots of feature for its user. An Android operating system is most widely used in the world. And there are lots of app that is being developed to run on this OS that makes it more user friendly. And today we will be discussing on a cool app of android that will help you to capture the person tries to unlock your android device in your absence. So we are here with the method for How To Capture Someone’s Picture Who Tries To Unlock Your Phone. The android app will let you to set up this security in your android device. Just read out the below to proceed.
Capture Someone’s Picture Who Tries To Unlock Your Phone
You may not want to endangers your privacy by giving your phone with other so better is to implement this and shock your friend by showing them your captured pictures while they was trying to unlock your android. Just read out the below steps to proceed.
Steps To Capture Someone’s Picture Who Tries To Unlock Your Phone :-
First of all you need to download and install the app Hidden Eye.
Now open the app in your android and you will see the three check box.
Now tick on the second option there and then click on ok button.
You can also check other option too according to your wish.
Make sure that the app gets activated after selecting all the options.
Now this app will work for you and when your friends try to unlock your android then this app will captures its pictures in your record.
In your free time you can check your records and can check that who tries to unlock your android in your absence.
Thats it you are done, now your android will caught your friends in your absence.
So above is all about How To Capture Someone’s Picture Who Tries To Unlock Your Phone. Now android will take care of itself in your absence and will tell you about the person’s who tries to unlock your android. Also this thing can resolve out big cases too. So must implement this in your android. Hope you like the discussion, don’t forget to share this cool trick with others too. leave a comment below if you have any related query with this.
Ever wanted that your Computer Welcomes you on Startup or at the Time of Booting ? Certainly yes. How does Jarvis Talks to Tony Stark must be the question that must have crossed your minds while watching Iron Man Movie. It isn’t a special trick. Even you can Learn How to make your Computer Speak for your Actions and even control most part of your Computer by using your Voice only. All you have to do is just write some codes in the Notepad and make a talking Computer like Jarvis. Check out Killer Trick to make your Computer Speak Like Jarvis using Notepad.
How to make a talking Computer like Jarvis using just Notepad Only :-
By following steps , you can easily make your PC respond like Jarvis. Moreover, it’s not that your computer will speak only, you can control your Computer with your voice itself. Check it out !!
As far as the implementation is concerned, type the above mentioned codes in Notepad and save it as speak.WSRMac .Now, right click on the file and click on “import signing Certificate” and automatically it will save a digital signature for it. now all you need to do is open Speech recognition and simply give your instructions in a Microphone. If you want some codes for other things to, Do ask me from here or in Comments.
With this trick, you can disable access to your USB(Universal Serial Bus) ports on your Windows based PC to prevent people from taking out data without permission or spreading viruses through the use of USB (pen and flash) drives. To use this trick to disable USB ports, follow the steps given below:-
Click on Start.
Click on Run. If you cannot find RUN, type it in the search box.
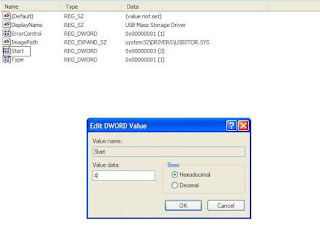
Navigate to HKEY_LOCAL_MACHINE\SYSTEM\CurrentControlSet\Services\usbstor.
In the work area, double click on Start.
In the Value Data box, enter 4.
Click on OK.
Close Registry Editor and refresh your desktop.
To re-enable access to your USB ports, enter 3 in the Value Data box in Step 6.
Try it yourself to make your PC invulnerable from data theft and malware which spread through USB ports. This works on Windows XP, Windows Vista, Windows 7 and Windows 8.
Note: This trick also disables access to your USB connected peripheral devices. So, do not use it if you have USB connected keyboard and mouse.
With the advent of ultra portable laptops, optical drives are becoming a thing of the past. Although not having optical drives allows manufacturers to make lighter devices, it causes problems to users when they want to fresh install operating systems, as most of them are still available in the form of CDs, DVDs and downloadable ISOs. For users of these devices, the only option then remains is to use a flash drive to install the operating system of their choice. Not surprisingly, there are also a few of us who prefer installing operating systems from flash drives for its faster speeds. There are also a few of us who prefer to keep live operating systems on our flash drives to access computers without having an OS by simply plugging in our devices.
With such a lot of users needing to create bootable USB flash drives, it appears imperative that OS manufacturers provide an inbuilt way to create them with each DVD and CD they provide. However, that is not the case with all operating system manufacturers.
In fact, most of the users are left hunting for third party applications that can create a bootable USB drive for their specific operating system. To add to a user's misery, the OS manufacturers that do provide an application for this make them OS specific (like the Windows 7 USB/DVD tool) and do not support ISOs and DVDs of other OSs. Some of them fail to work even if the original ISO/DVD is slightly modified (slipstreamed etc.).
Use Rufus to create bootable USB media
If you too are one such user looking for a solution, you can stop looking and try Rufus, an open source tool to create a bootable USB drive from any bootable ISO.
Rufus is small in size (nearly 615 KB) and claims to be faster at creating bootable USB drives than most applications of its type. Rufus is also portable which means that you need not install this software to use it. Just double click on the executable file and the application will start working. Rufus also allows you to add fixes to use your bootable flash drives on older computers having BIOSs which do not support booting from them.
Strangely however, Rufus can only create bootable flash drives from ISOs meaning you need to have an ISO image of the CD or DVD of the OS of your choice.
I do not think this should be too much of a problem considering how easy it is to create ISOs from DVDs and CDs.
How to use Rufus?
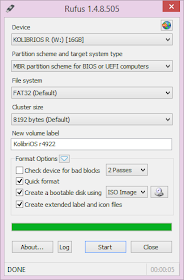
1) When you start Rufus, the first option that you will see is Device:. It contains all your connected USB drives. If you plug in a USB drive after starting Rufus, the drive you have connected will shortly be available here.
2) You will not need to modify the Partition Scheme and target system type, as the default choice is suitable for making the USB drive work on both UEFI and legacy BIOS computers.
Rufus in Windows 8
3) Change the file system from FAT32 to NTFS from the dropdown menu. This is the file system with which your USB drive will be formatted with. Do note that older computers will not boot from a flash drive formatted as NTFS. Do not modify the cluster size. Enter the name you want for your USB device in the Volume label box.
4) Check the Create a bootable disk using checkbox if it is not already checked. In the dropdown menu next to it, select ISO image. Click on the button right to it to locate your ISO image.
Do note that Rufus will format your USB drive deleting everything on it before making it bootable. So, make sure that it does not contain any important data.
5) Click on Start to format your USB drive and extract all files of the ISO to it.
To install the OS, restart your computer and select your USB device as the primary boot option in the BIOS boot menu.
Compatibility Rufus works on all the latest versions of Windows and can be used to extract the following ISOs to a bootable USB drive:-
Arch Linux, Archbang, BartPE/pebuilder, CentOS, Damn Small Linux, Fedora, FreeDOS, Gentoo, GParted, gNewSense, Hiren's Boot CD, noppix, KolibriOS, Kubuntu , Linux Mint, OpenSUSE , ReactOS, rEFInd, Slackware, Tails, Trinity Rescue Kit, Ubuntu, Ultimate Boot CD, Windows XP (SP2, SP3), Windows Server 2003 R2, Windows Vista, Windows 7, Windows 8, Windows 8.1 and many more.
If you face any problem, you can write about it in the comments.


 Edit
Edit