Your phone can do a lot of things, but can it do what you want it to? Maybe. The engineers and designers at Apple are determined to make the most user-friendly products and anticipate your needs as much as possible. However, they're not always the best at letting their customers know all the things their products can do.
1. Set a sleep timer for your music.
If you like to drift off to peaceful slumber to serene, relaxing music, but you don't want it to keep playing long after you're asleep, you can set a timer through the Clock app.
2. Create your own custom vibration pattern.
You can tap out your own vibration pattern to customize it for certain contacts or for types of notifications. Just go to Settings>Sounds>Ringtones>Vibration>Create New Vibration and use your finger to tap out the pattern.
3. Flashing alerts.
If you're in a crowded restaurant and waiting on an important call, you could easily miss your ringtone or vibration. Take it up a notch by enabling the camera's LED for notifications through Settings>General>Accessibility.
4. Shake it to undo mistake-filled typing.
Just like an Etch-A-Sketch (for those of you who remember such things), you can just shake your phone to start over fresh when you make mistakes.
5. Make your phone run faster by clearing up RAM.
If you hold down the power button long enough to see the "slide to power off" prompt and then hold down the home button, the screen will go blank and then your home screen will re-appear.
6. Make your phone run faster by clearing the cache.
If clearing the RAM didn't help much, try clearing the cache. In any of the App Store, Podcasts, Music, Game Center, and Phone apps, tap any single icon along the bottom 10 times to clear the cache.
7. Check timestamps for text messages.
Isn't it annoying how your conversations seem to float free in time, without any relation to reality? Well, the time stamps for messages are actually there; they're just off the screen. Drag your thumb to the left to reveal the time stamps of each message.
8. See all the tabs you recently closed in Safari.
If you want to go back and reread or forward an article you closed recently, just hold down the "+" symbol at the bottom of the screen to have Safari open up a list.
9. Turn your iPhone into a level.
You don't need to download a third-party app, just launch the Compass app and swipe left.
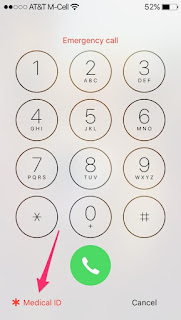
10. Provide critical medical information in case of emergency.
You always knew your phone was a lifesaver, but now it literally could be. You don't necessarily want to rely on your phone to cough up important information when your life is on the line, but it's another helpful tool. Fill out the form under the Health app with as little or as much detail as you like; remember, this information is available without unlocking your phone, so only put in info that you're comfortable sharing.
11. See only unread emails in your inbox.
Because a cluttered inbox is the worst, open the Mail app and tap the Mailboxes link, then tap "Edit." Tap the circle next to "Unread" and you'll have a folder with only your unread emails.
12. Find out what flights are overhead.
Ever see a jet up in the sky and wonder where those folks are headed? As with so many things in life, just ask Siri and she'll come up with the answer.
13. Don't settle for bad wifi.
Is there anything more frustrating than a slow connection? You don't have to suffer through that nightmare anymore. Go to Settings>Cellular, scroll to the bottom, and turn Wifi Assist on. Just like that, if you're on a poor wifi connection, your phone will automatically switch back to your LTE connection. And if you're worried about a big bill for data at the end of the month, Wifi Assist won't activate with background downloading or with some third-party streaming apps.
14. Use Night Shift and Low Power Mode at the same time.
Apple introduced the low-light mode to be easier on the eyes after dark, but for some reason didn't want it to be active at the same time as Low Power Mode. Determined users have found a workaround, however. Once again, get Siri to do it. Specifically, activate Low Power Mode in Settings>Battery, then start Siri and ask her to enable Night Shift. Siri will warn you about having to turn off Low Power Mode to turn on Night Shift, but tell her to go ahead anyway. Before Siri confirms, press the sleep button. You should hear a confirmation beep and, when you unlock your phone again, Night Shift and Low Power Mode should be running at the same time.
15. Hard reset.
When absolutely nothing else will work, it's time for a hard reset. Sometimes your phone just needs a timeout. Hold down the home and lock buttons for five seconds or until the Apple symbol shows up and you'll be back in business.
Everybody has craze about iPhone, iOS. Some People can’t afford this costly product. So, as everybody knows that android is getting popular day by day due to it’s customization. So, if you are android user who want to change his android into iOS 7 then you are at right place. We are not here porting system files to make transform android into iOS. I am simply going to tell you the best apps, launchers to covert you smart android into iOS.
Espier Launcher 7 is the flat-style edition of the best and the most popular Apple style home screen app for Android devices. In this edition, you can experience the perfect Android implementation of Apple’s flat style font, layout, search page, and animations. Now, you can feel the simplicity on your Android devices.
install ios on android
Features From Play Store :
Flat-style.
Dozens switches or options, which help the launcher matches your Android device perfectly.
Unique multi-language support; Dozens languages supported, and more and more.
The is simple lock screen of iOS 7 can be had on your Android with this app, you get the flat style lock screen with the parallax effect to boot, the camera launcher, sliding to unlock and passcode. This locker updated with the latest lock screen security. This app will lock your screen with two different layers of securities.
Next step to install ios on android is the ios launcher .Espier Notifications 7 is a flat style personalized status bar, notification page, and notification management plugin for Espier Launcher 7. Espier Notifications 7 can help you to manage the notifications sent by apps to the status bar or the notification page. It can make your status bar and notification page clear and uniform, and enhance the visual effects of your Android device’s notification display.
install ios on android
Features From Play Store :
The clear status bar and the notification page in flat style.
Three tabs in the notification page: Tody, All, and Unread.
Merge multiple notifications of an application into one intelligently.
Use Notification Center to effectively manage which notifications can be displayed and how.
Espier Control Center 7 is a plugin for Espier Launcher 7 (or Espier Launcher). This app can help you to rapidly control the system functions such as Airplane Mode, WiFi, Wireless, Bluetooth, and so on. It can also help you to quick launch some tool apps, such as flashlight, clock, calculator, and camera.
install ios on android
Features From Play Store :
The control center in Apple’s flat style.
Rapidly control system functions, such as Airplane Mode, WiFi, Wireless, Bluetooth, and so on.
Quick launch the frequently used apps, such as flashlight, clock, calculator and camera.
Control music player and sound volume by setting a 4×1 or 5×1 widget.
Espier Dialer 7 is the best dialer and contacts app for Android phone in Apple’s flat style. This app allows you to experience the contacts management and the call management in Apple’s flat style on your Android mobile phone.
install ios on android
Features From Play Store :
Apple’s flat style user interfaces, simple and practical.
Favorites management helps you to manage your frequent contacts.
Easily manage the call log ordered by all and missed.
Alphabetical list of contacts helps you locate your contact easily.
Dial Pad provides support for T9 intelligent matching
In macbook there are many software available for screenshot but today i going to show you how to take screenshot without any software
You don’t need to download any screenshot capturing app or software on your iPad or Mac. However, you need to do little manipulation with your device in order to have a screenshot.
This is the simple trick that Apple has not officially released or unveiled but we have got it for you. If you really want to learn to take a screenshot on Mac or iPad then you need to follow the steps which are mentioned below.
Learn-How to Take a Screenshot on a Mac
First, you are going to learn that, “how to take a screenshot on a Mac?” The steps of doing it and getting access to your screenshots are mentioned below. Follow the steps carefully to get the answer of your question.
The method of taking screenshots on a mac, consists two ways. One is to take the screenshot of complete screen of your program and the second one is to take a screenshot of particular area on your Mac’s desktop.
Method: 1) Take a Screenshot of Complete Screen
This method is going to teach you take the screenshot of the complete screen of running program, any webpage or of any software.
First of all open the program, window or software whose screenshot you want to capture
Afterwards, Press Command+Shift+3 on your keyboard and release all keys
You have captured the screenshot. Now, to get the access to your screenshot you need to go to Desktop of your Mac and there you will see a image file with .Pngextension, you need to double click on that image file to preview it
That is the screenshot which you have captured. Now you can upload it to your website, share it with your friends or use it for any other purpose for which you have captured it.
Method: 2) Take a Screenshot of Particular Area of Screen
Now, this method is going to teach you to take a screenshot of particular area of the screen of any running program, software or website. This can be real sophisticated method. Since, everybody want to take a screenshot of any particular area. So, this can be helpful and workable method for you guys.
First of all open the program, webpage or any application whose screenshot you want to capture
Afterwards, press Command+Shift+4 on your keyboard and then release all these keys
Now your mouse cursor will be changed. You need to take your mouse to the corner of the area whose screenshot you want to capture. Now Press down and drag your mouse to the area where you want to take a screenshot
Ones you are done, simply release your mouse
Now to access to your screenshot, you need to go to your Mac’s desktop and there you will see an image file with .Pngextension
You need to double click on that image to preview it. Now you can use that wherever you want to use it
Congratulations! You have successfully captured a screenshot of particular area on your Mac.
Learn-How to Take a Screenshot on an iPad
This is one of the simplest trick of this tutorial. It is not as complicated as above one. You can learn to take a screenshot on an iPad with these simple steps which are elaborated below.
First of all Open the app or Program whose screenshot you want to capture
Then Press Home and Sleep/Wakebutton at the same time.
Afterwards, you will listen a camera shutter sound that means your screenshot has been captured
Now to see your captured screenshot. You need to go photos from your settings and then Tap on Camera Roll
Furthermore, there you will be able to see the screenshot which you have recently captured.
Conclusion
This was the detailed article which has guide you that, “how to take a screenshot on a Mac and on an iPad?” I am sure this tutorial has helped you a lot and you will be able to take screenshots without using any software or app on your Mac or iPad.
However, if you have any kind of confusions or have any questions to ask then do share your queries and questions with us. We shall try to remove your all related queries as soon as possible.
Finally, if you think that this article which has guide you to take a screenshot using Mac or iPad is helpful then don’t forget to share it with your friends or circle in order to help them out as well