Showing posts with label D tricks. Show all posts

Sunday, July 26, 2015

Killer Trick to make your Computer Speak Like Jarvis using Notepad

Killer Trick to make your Computer Speak Like Jarvis using Notepad
TrickedPC
Ever wanted that your Computer Welcomes you on Startup or at the Time of Booting ? Certainly yes. How does Jarvis Talks to Tony Stark must be the question that must have crossed your minds while watching Iron Man Movie. It isn’t a special trick. Even you can Learn How to make your Computer Speak for your Actions and even control most part of your Computer by using your Voice only. All you have to do is just write some codes in the Notepad and make a talking Computer like Jarvis. Check out Killer Trick to make your Computer Speak Like Jarvis using Notepad.

How to make a talking Computer like Jarvis using just Notepad Only :-

By following steps , you can easily make your PC respond like Jarvis. Moreover, it’s not that your computer will speak only, you can control your Computer with your voice itself. Check it out !!
  • Computer Welcomes You :

<listenFor>Jarvis</listenFor>
<speak>Hello Mr. STark</speak>
</command>
</speechMacros>
  • Shutting Down Computer :

<speechMacros>
<command>
<listenFor>Nuke it</listenFor>
<speak>Restarting Windows</speak>
<run command=”C:\Windows\System32\shutdown.exe”/> </command>
</speechMacros>
  • To change Songs in Media :

<command priority=”100″>
<listenFor>next change</listenFor>
<sendKeys>{ALT}rh</sendKeys>
</command>
<command priority=”100″>
<listenFor>accept change</listenFor>
<sendKeys>{ALT}rac</sendKeys>
</command>
As far as the implementation is concerned, type the above mentioned codes in Notepad and save it as speak.WSRMac .Now, right click on the file and click on  “import signing Certificate” and automatically it will save a digital signature for it. now all you need to do is open Speech recognition and simply give your instructions in a Microphone. If you want some codes for other things to, Do ask me from here or in Comments.
Saturday, May 9, 2015

Disable USB ports on Windows PC via Registry

With this trick, you can disable access to your USB(Universal Serial Bus) ports on your Windows based PC to prevent people from taking out data without permission or spreading viruses through the use of USB (pen and flash) drives. 

To use this trick to disable USB ports, follow the steps given below:-

  1. Click on Start.
  2. Click on Run. If you cannot find RUN, type it in the search box.
  3. Type "regedit" without quotes. This will launch the Registry Editor.
  4. Navigate to  HKEY_LOCAL_MACHINE\SYSTEM\CurrentControlSet\Services\usbstor.
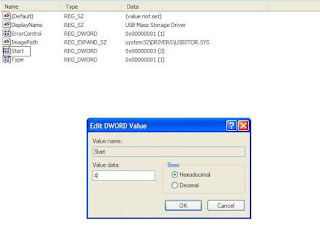
  5. In the work area, double click on Start.
  6. In the Value Data box, enter 4.
  7. Click on OK.
  8. Close Registry Editor and refresh your desktop.
  9. To re-enable access to your USB ports, enter 3 in the Value Data box in Step 6.

Disable access to USB ports on your PC using Registry Editor

Try it yourself to make your PC invulnerable from data theft and malware which spread through USB ports. This works on Windows XP, Windows Vista, Windows 7 and Windows 8.

Note: This trick also disables access to your USB connected peripheral devices. So, do not use it if you have USB connected keyboard and mouse.

Monday, April 27, 2015

Create Bootable USB Drives to Install (Almost) Any OS

With the advent of ultra portable laptops, optical drives are becoming a thing of the past. Although not having optical drives allows manufacturers to make lighter devices, it causes problems to users when they want to fresh install operating systems, as most of them are still available in the form of CDs, DVDs and downloadable ISOs. For users of these devices, the only option then remains is to use a flash drive to install the operating system of their choice.

Not surprisingly, there are also a few of us who prefer installing operating systems from flash drives for its faster speeds. There are also a few of us who prefer to keep live operating systems on our flash drives to access computers without having an OS by simply plugging in our devices.
Bootable USB drives from ISO

With such a lot of users needing to create bootable USB flash drives, it appears imperative that OS manufacturers provide an inbuilt way to create them with each DVD and CD they provide. However, that is not the case with all operating system manufacturers.

In fact, most of the users are left hunting for third party applications that can create a bootable USB drive for their specific operating system. To add to a user's misery, the OS manufacturers that do provide an application for this make them OS specific (like the Windows 7 USB/DVD tool) and do not support ISOs and DVDs of other OSs. Some of them fail to work even if the original ISO/DVD is slightly modified (slipstreamed etc.).

Use Rufus to create bootable USB media

If you too are one such user looking for a solution, you can stop looking and try Rufus, an open source tool to create a bootable USB drive from any bootable ISO. 

Rufus is small in size (nearly 615 KB) and claims to be faster at creating bootable USB drives than most applications of its type. Rufus is also portable which means that you need not install this software to use it. Just double click on the executable file and the application will start working. Rufus also allows you to add fixes to use your bootable flash drives on older computers having BIOSs which do not support booting from them.

Strangely however, Rufus can only create bootable flash drives from ISOs meaning you need to have an ISO image of the CD or DVD of the OS of your choice. 

I do not think this should be too much of a problem considering how easy it is to create ISOs from DVDs and CDs.

How to use Rufus?

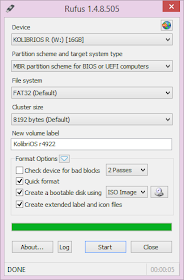
1) When you start Rufus, the first option that you will see is Device:. It contains all your connected USB drives. If you plug in a USB drive after starting Rufus, the drive you have connected will shortly be available here.

2) You will not need to modify the Partition Scheme and target system type, as the default choice is suitable for making the USB drive work on both UEFI and legacy BIOS computers. 

Create Bootable USB drives
Rufus in Windows 8

3) Change the file system from FAT32 to NTFS from the dropdown menu. This is the file system with which your USB drive will be formatted with. Do note that older computers will not boot from a flash drive formatted as NTFS. Do not modify the cluster size. Enter the name you want for your USB device in the Volume label box.

4) Check the Create a bootable disk using checkbox if it is not already checked. In the dropdown menu next to it, select ISO image. Click on the button right to it to locate your ISO image.

Do note that Rufus will format your USB drive deleting everything on it before making it bootable. So, make sure that it does not contain any important data.

5) Click on Start to format your USB drive and extract all files of the ISO to it.

To install the OS, restart your computer and select your USB device as the primary boot option in the BIOS boot menu. 

Compatibility
Rufus works on all the latest versions of Windows and can be used to extract the following ISOs to a bootable USB drive:-

Arch Linux, Archbang, BartPE/pebuilder, CentOS, Damn Small Linux, Fedora, FreeDOS, Gentoo, GParted, gNewSense, Hiren's Boot CD, noppix, KolibriOS, Kubuntu , Linux Mint, OpenSUSE , ReactOS, rEFInd, Slackware, Tails, Trinity Rescue Kit, Ubuntu, Ultimate Boot CD, Windows XP (SP2, SP3), Windows Server 2003 R2, Windows Vista, Windows 7, Windows 8, Windows 8.1 and many more. 

If you face any problem, you can write about it in the comments.

Tuesday, February 3, 2015

How To Run Games Without Graphics Card

Hello everyone,.Now as i told in my recent post that i will give you tutorial on how to run games without graphics card so thats here. Using this tutorial you will able to run high end games on low-end computer easily without having good graphics card. I am sure many of you facing this graphics card problem. As we with the advancement in technology my people are unable to run games. So, is there any need to buy new Pc/Laptop or graphics card to run games? Well no, by using the below method you can run games which requires graphics card. Lets start here:-

How To Run/play Games Without Graphics Card :-


Using 3D-Analyze :-

3D Analyze is a powerful application that allows to play many DirectX based games using video hardware officially unsupported and unable to run these.With it you can optimize efficiency, above all if your CPU will permit, although still with a low range card. This program supports Direct3D as much as OpenGL, whichever it may be to optimize your system.Now I’will show you how to install and configure 3D-Analyze main settings to play gamesfor this just follow the following steps:-

Step 1: First of all download the 3D analyze.
Step 2: Now install and run the 3D analyze.
Step 3: Now click on select option as below and then a window opens where you have to select the exe file             of the game which you wants to run.

Step 4:
 Now you can see names, vendorID and deviceID of different graphics cards. Select any one of  them and enter the VendorID and DeviceID in the column at the left side.
Step 5: Just click on Run button and Enjoy !!

Using SwiftShader :-

SwiftShader’s modular architecture is capable of supporting multiple application programming interfaces, such as DirectX® 9.0, and OpenGL® ES 2.0, the same APIs that developers are already using for existing games and applications. SwiftShader can therefore be directly integrated into applications without any changes to source code.It is also similar to 3D analyze.Step 1: First of all download theSwiftShader.
Step 2: Now extract the zip file of SwiftShader.
Step 3: Now copy d3d9.dll file from the extracted folder.
Step 4: Paste the d3d9.dll file to the game’s directory.
Step 5: Just click on exe file of your game where you placed the d3d9.dll file and Enjoy !!
That’s it i am sure it will help you. If you are facing any problem then just comment below. Thanks

Saturday, January 31, 2015

Use Both Data And WiFi For Boost Internet Speed

If you are here then you may be boost up with your internet speed on your mobile.You may find it easy to use internet on mobile by connecting to your home or business WiFi for faster access well, as human mentality every one wants more and more speed while using internet .If you are one of this type then you are at right place. Here today i am going to introduce you to the app that may assist you to use your net pack and WiFi at a same time for quicker net. Although,at least once while using internet you might have a question that can i use packet data and WiFi at same time.Generally it is not possible because as soon as you turn on you WiFi your packet data got disconnected. and now here at i am going to introduce you to one such apps that will help you to do use packet data and WiFi at same time So now without wasting way more time lets come back on this superb however useful trick.

Use Both Packet Data And WiFi For Boost Internet Speed :

Requirements:

1. Rooted android device of version 2.2 or higher
2. WiFi and Packet Data available at same time
3. Need to Donload “Super Download” App for Android [Paid Version Link] [Free VersionLink]
Just click on download link and if this application recognize your it , it will start downloading that thing itself, but if this method doesn’t work then click and hold the link and then from the menu that will appear click on “Share with” and then chooseSuperDownload. Finally you can copy and then paste URL In “Add URL” Dialog  and you can can set to speed up your download.

Some Instructions:

  • Using Both of the networks, packet data and WiFi require root access in your android. And also remember to say “authorize” to the superuser prompt.
  • As you are using WiFi along with your packet data ,  you may incur in additional charges from your network operator for using packet data only.
  • To make the software use it’s full power , this software requires good  and balanced WiFi And mobile packet data without any dis connectivity.
  • If you are having good WiFi, still you need 3G or 4G network to make software to work at it’s fullest
  • Using Both connections is not supported by some devices
  • Some web server may not provide to much downloading speed as will your packet data and wifi will give simultaneously.
  • Currently only http and https protocols are supported (no ftp or torrent yet)
  • The Lite version or free one  has a file-size limit of 50 megabytes.

Thursday, December 25, 2014

How to Remove shortcut Virus from USB, Memory Card and Harddisk

I have seen many people asking me questions like how to remove shortcut virus from pendrive?, or how to fix shortcut virus? how to clean shortcut virus?, how to delete shortcut virus? and so on for that greedy shortcut virus.This problem is generally found in Windows Xp or 7 . This problems also comes in PC with antivirus installed.So antivirus can't help us in this issue. This virus creates a shortcut folder inside your USB Pendrive, Hard disk, PC, Memory Cards. Here I am going to explain two methods to remove shortcut virus from pendrive and other USB devices.
How To Remove Shortcut Virus From Pendrive

Method 1 

Check if  the files of the USB are not in hidden mode.
Now let's start ,Follow the following steps.
Step 1:
Autorun Exterminator
  • First , Connect your pendrive/USB/Memory Card to your PC.
  • Click on the given link and download the file “AutorunExterminator” Download AutorunExterminator.
  • Extract it –> and Double-click on “AutorunExterminator”.
  • It works in background so you will see a cross icon in notification bar as shown below.notoications bar
  • This process will help us remove the autorun.inf files from USB/Memory Card.
Method 2:
  • In this step you have to remove shortcut virus using CMD.
  • Click on “Start” –>Run –> type cmd and click on OK.
  • let me consider your drive letter as G:
  • Enter the this  command:

attrib -h -r -s /s /d g:\*.*

or

attrib G:\*.* /d /s -h -r -s

  • You can also copy the above command –> Right-click in the Command Prompt and paste it. 
cmd windows

P.S: Please Don’t forget to replace the "letter G" with your drive letter. Give a look to your files.
Step 3:
Malwarebytes

Note: Default option is “Quick Scan” change it to “Full Scan” and select your drive of which you want to full scan.

Method 2

  • This tool actually is the official shortcut virus removal tool and it vaccinates your USB against further viruses attack and creating shortcuts. xD
  • First , Download “UsbFix” (developed by El Desaparecido) here [ Download Here]
  • If your antivirus not allowing this application to run, disable antivirus temporary from control panel.
  • Plug in your usb devices (USB Pendrive, Hard disk, PC, Memory Cards)
  • Double click on UsbFix.exe
  • Click on deletion and you are done! :)
tool to remove shortcut virus from pendrive

  • Note that it will restart your PC automatically. 
  • Access your deletion report at ( C:\UsbFix.txt )
  • This tool will help to remove shortcut virus from pendrive.
Still having any Doubts? Feel Free to ask in the comments Section! :)

Monday, December 1, 2014

How To Check Who Used Your PC In Your Absence!

These Days Generally Some People Log Into Our PC And Check Photos And Other Data Or Any Other Useful Information Without Our Permission, And We Always Don’t Want Anybody To Access Our PC Without Our Permission Which Most Of The People Like To Do . If You Want To Know The Details That When Was Your PC Accessed, Then I Am Here To Show You How Can You Check Who Logged On To Your PC.

Check Who Use Your PC In Your Absence? – Procedure

1)     First goto start and type Run > After that in run type 'cmd' (without inverted comas) and press Enter.

2) The command prompt window will open ,  Now type eventvwr.msc and press enter


3)     Wait for some time ,after that the Event viewer window will open.


4)   The event viewer window will show you the Detail logs of your PC, It stores Three types of log files
  • 1)     Application
  • 2)      Security,
  • 3)     System
All logs are Archived and Reviewed, We are using the System Log to fulfill our purpose 
5)     Click on Windows log and select System log

6)  This will show you all the detail of your PC which happened recently. That’s all after doing above steps you will get the detailed report of who logged in your PC. If you will find any problem on this post (Check who use your PC in your Absence?) then let me know in below commenting. 

Friday, November 28, 2014

Facebook's Latest Prank : Suggest Your Friends To Themselves

Have you ever got a friend request from yourself to yourself? Sounds weird and quite amazing, right? lemme explain this to you.Suggest your friends to yourself Chrome extension will suggest your friends to their own account. You can send friend request to yourself ! 


Your friends will start to think that someone may have created their fake account or someone may have succeeded to hack their account but that wrong ! You haven't been hacked or someone hasn't created your face profile, instead its a kind of bug of Facebook found out by a geek boy Dinesh Bhosale.. Your friends will go crazy when they will see that you suggested them to their own account.

YOU CAN DOWN THIS EXTENSION BY CLICKING HERE!

This extension is developed by Dinesh Bhosale.

This Prank Is Made For Fun, But Don't Take It Seriously, Enjoy It And Share With Your Friends And Make The Extension Popular :D

  1. It is just a prank and doesn't produce any harm.
  2. No Facebook bans and no data is saved by the extension.
  3. You can suggest your friends to themselves for any number of times without getting blocked or reported.
  4. Extension is 100% free and it works with all Facebook accounts.
  5. You can use this extension on infinite number of accounts.

Steps To Suggest Your Friends To Themselves

  1. Install Facebook social toolkit chrome extension from chrome web store.
  2. Start Facebook Social Toolkit chrome extension.
  3. Click on suggest friends to themselves button (as shown in the screenshot)
  4. Enjoy!

How Does It Work? 

Extension sends a confusing request to Facebook servers and that's how it works.